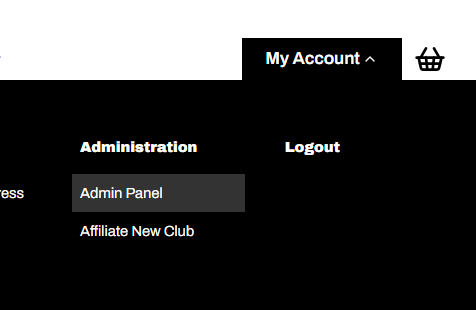
1. Select the Admin Panel
Hover over My Account and select Amin Panel
2. View Entries.
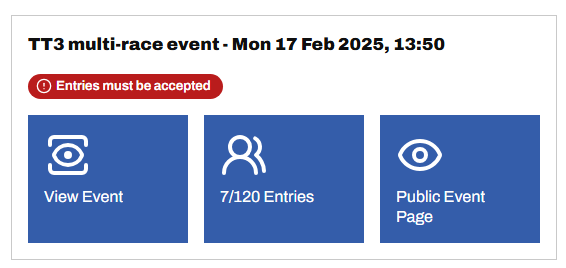
Either select your event directly from your Admin Home Dashboard by clicking the Entries must be accepted label...
... or
Click Events from the menu on the left. (If you don't see a menu on the left, click the ☰ icon).
Click the My Organiser radio button at the top.
Select your event and click Entries must be accepted
3. Optionally select, reposition and reorder the data
4. Accept Entries
Only entries in Awaiting Acceptance status can be accepted. Incomplete Entries (🔗) will remain in Draft status and cannot be accepted but may be rejected.
To select all, tick the box at the top to select all riders. Then click Actions and Accept
To select a subset of riders, tick the box to the left of their name. Then click Actions and Accept
5. Accepting Entries as Reserves
If your event is oversubscribed you may Accept riders as Reserves, provided all of the following are true:
Your event is oversubscribed
You have accepted entries to capacity. i.e. the number of Accepted Entries = the Entry Limit as defined for your event
Riders have selected they are willing to be accepted as a reserve
You have not exceeded your Reserve Rider Limit as defined for the event
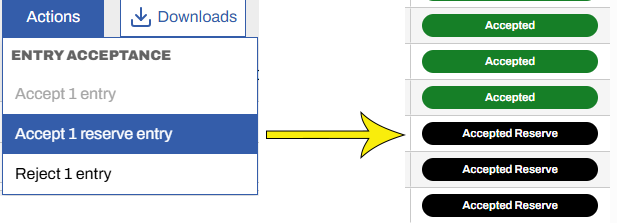
To Accept a rider as Reserve, tick the box to the left of their name. Then click Actions and Accept reserve entry
6. Upload Start Sheet
You will need to create a Start Sheet outside of the site. The Start Sheet (not to be confused with Start List) is the document that gives race and HQ details along with anything else you want to communicate to riders concerning the event. Once built, click the Startsheet has not been published button from the event page. You'll see a page similar to the one below. Click the Upload Startsheet button to upload.
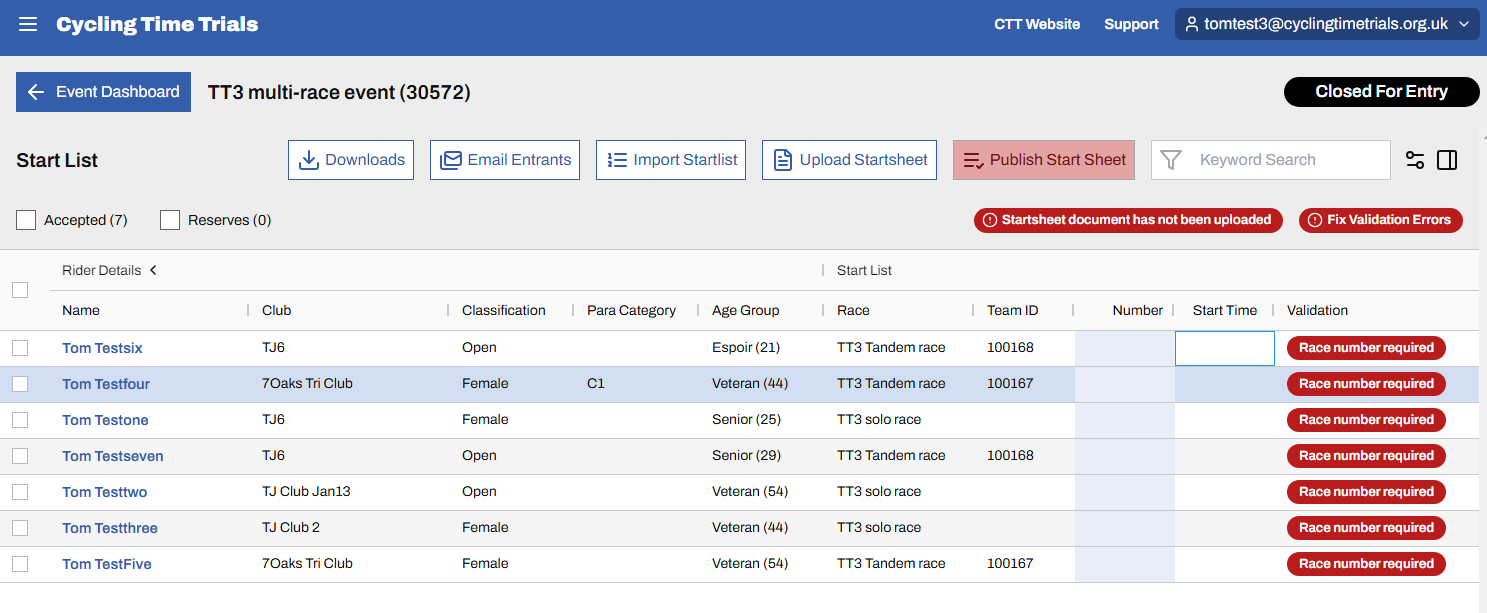
7. Create the Startlist
The Startlist can be created in one of two ways: either directly in the grid, shown above, or via a spreadsheet upload. To create directly in the grid, simply type the rider numbers into the number column. Times will be generated automatically. Again, viewable columns can be selected via the ◫ icon top right, then dragged into position by hold-clicking their headers. You may need to scroll to the right to see all columns on the screen. Note in particular the LTS columns to the right. Click the column header to order by LTS.
8. Alternatively Create the Startlist via a spreadsheet upload
8.1 Download Accepted Entries
Click the Downloads button, followed by Accepted Entries. This will download a spreadsheet to your downloads folder.
Open it and add start times and numbers. Note, start times use a 24hr format.
8.2 Build the Start List
The spreadsheet will be validated on upload so please make sure the start numbers and times correspond and that there are no duplicate start numbers (except tandem riders) or start times (except tandem and team riders).

8.3 Import Start List
Click the Import Startlist button and select your saved spreadsheet with rider times and start numbers. The system will highlight any formatting errors or missing data before it can be uploaded. Fix any errors and upload. There is a second round of validation that checks the content of the data once uploaded. If needed, fix any errors highlighted.
If you are having difficulties getting the start list to upload or pass validation when it does, please read why won't my startlist upload (🔗)